How to wipe a hard drive: Secure Data Destruction Guide

Dragging a few files into the trash bin might feel like you're cleaning house, but it's not even close to wiping a hard drive. That action just removes a pointer, leaving the actual data sitting on the disk, ripe for the picking by anyone with basic recovery software. To make sure that information is gone for good, you have to overwrite the entire drive with random data. Only then is it truly irretrievable.
Why "Deleting" Files Is a Security Blind Spot
For any IT director, the sight of a pallet of decommissioned hard drives is all too familiar. The quick and easy path is to run a simple format or drag old folders to the trash, but that's one of the biggest—and most common—security mistakes an organization can make. These actions are dangerously misleading because they don't actually erase anything.
Think of it like this: deleting a file is like tearing the index card out of an old library card catalog. The book itself—your data—is still sitting right there on the shelf, even if it's a little harder for the average person to find. But for a data thief armed with recovery tools, it's an open invitation. Those "deleted" files are easily restored, turning your discarded drives into a treasure trove of sensitive information.
The Hidden Risk of Data Remanence
That lingering information is called data remanence—the ghosts of data left behind after you think you've deleted it. For businesses in healthcare, finance, or any regulated industry, ignoring data remanence can lead to catastrophic breaches and eye-watering regulatory fines. A single server drive could hold thousands of patient records or confidential financial data, all accessible.
This is why enterprise-grade data wiping isn't just a cleanup task; it's a critical part of your risk management strategy. It’s the process that ensures when a drive leaves your facility, it takes no secrets with it. For drives at the end of their life, it's also crucial to work with a certified partner for secure electronics recycling.
Key Takeaway: True data sanitization means overwriting every single sector of a drive. Anything less leaves your organization exposed to serious financial and reputational harm. Assuming a formatted drive is clean is a gamble you simply can't afford to take.
The sheer volume of drives cycling through a modern data center magnifies this risk. Just look at Backblaze, which managed over 270,000 hard drives in 2023 and had to replace a failed one roughly every two hours. With a lifetime annualized failure rate of 1.46%, even the best drives eventually die—often with sensitive data left intact and vulnerable if not properly sanitized before disposal.
Choosing the Right Data Destruction Method
Picking the right way to wipe a drive isn't a simple, one-size-fits-all decision. The best method really boils down to the type of media you're dealing with, how sensitive the data is, and what your organization's compliance rules demand. Get it wrong, and you could be looking at a failed audit or, worse, physically destroying a perfectly good asset you could have reused.
The National Institute of Standards and Technology (NIST) lays out a solid framework in its Special Publication 800-88, which details three core levels of data sanitization. Getting familiar with these is the first step in matching the right technique to the task at hand.
Think of it like a decision tree: a properly verified wipe leads down a secure path to reuse or final destruction. Any other route, like just deleting files, is a shortcut to a potential data breach.
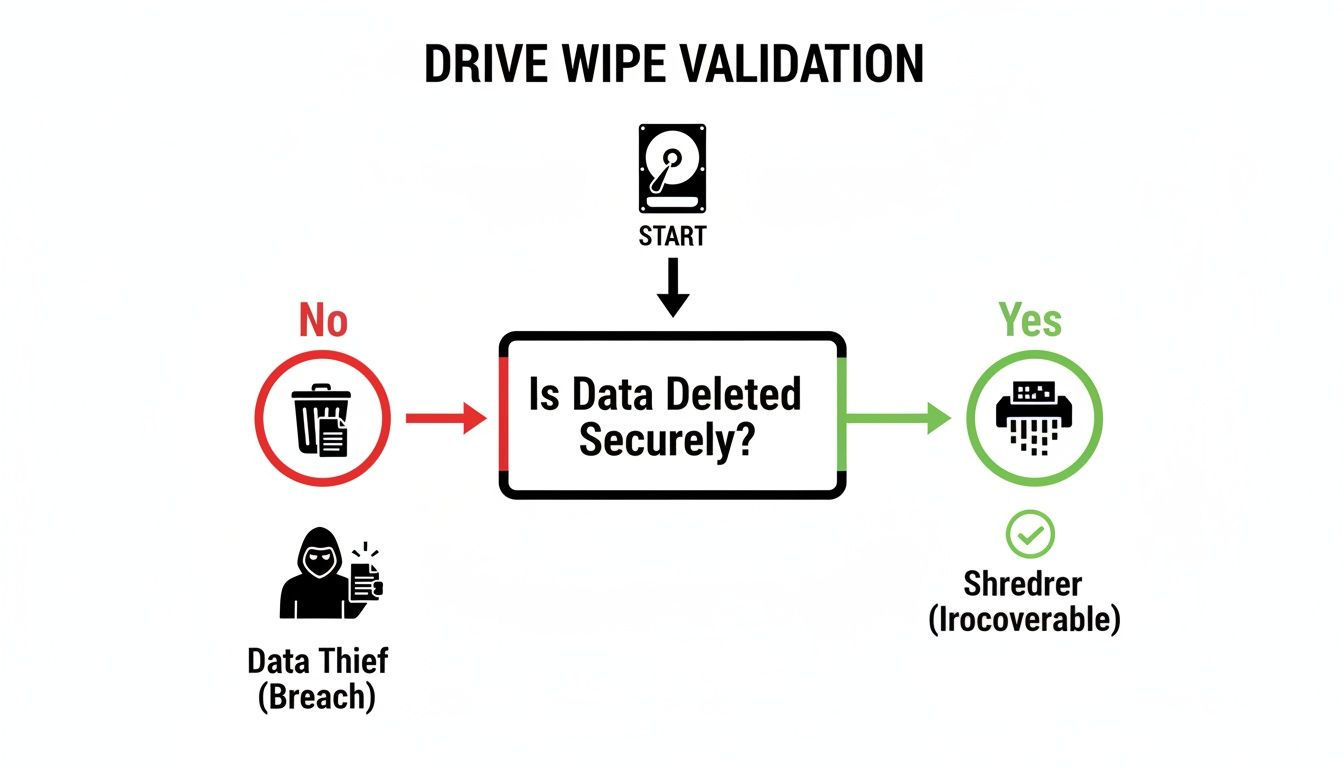
This process flow shows exactly why just hitting 'delete' isn't enough. Only a verified, methodical process guarantees your data is truly gone for good.
Understanding the NIST Sanitization Levels
The NIST guidelines break down data destruction into three clear categories. Each one serves a different purpose and offers a specific level of security assurance.
- Clear: This is a software-based overwrite. It writes new data—usually just a pattern of ones and zeros—over all user-accessible parts of the drive. It’s great for stopping basic, non-invasive data recovery attempts.
- Purge: This is a much tougher method. Purging makes data recovery practically impossible, even with specialized lab equipment. Techniques like degaussing, cryptographic erase, and certain built-in firmware commands fall under this umbrella.
- Destroy: This is the end of the line. Physical destruction makes the media completely unusable and ensures no data can ever be recovered. We're talking about shredding, pulverizing, or even incineration.
For most routine asset retirement where you plan to reuse drives internally, the Clear method is usually plenty. But when you’re handling highly sensitive data or devices that are leaving your control, stepping up to Purge or Destroy is non-negotiable.
To help clarify which method to use and when, here’s a quick breakdown based on the NIST SP 800-88 guidelines.
Comparison of Data Destruction Methods (NIST SP 800-88)
| Method | NIST Level | Best For | Effective on SSDs? | Allows Reuse? | Key Consideration |
|---|---|---|---|---|---|
| Software Overwrite | Clear | Routine internal reuse of non-sensitive assets. | No (Unreliable) | Yes | Standard for HDDs but misses hidden data on SSDs due to wear leveling. |
| Cryptographic Erase (CE) | Purge | Self-Encrypting Drives (SEDs) in servers, laptops. | Yes (Ideal) | Yes | Extremely fast and effective, but only works on SEDs. |
| ATA Secure Erase | Purge | Non-encrypting SSDs. | Yes | Yes | A firmware command that resets all storage blocks. Reliable but slower than CE. |
| Degaussing | Purge | Magnetic media like HDDs and tapes. | No (Useless) | No | Renders HDDs unusable by destroying firmware tracks along with data. |
| Shredding/Pulverizing | Destroy | End-of-life drives, failed drives, or high-security needs. | Yes | No | The ultimate guarantee of destruction, but eliminates all asset value. |
This table makes it clear: the technology inside the drive is the biggest factor. Using the wrong method doesn't just fail to secure your data—it can give you a false sense of security.
Matching the Method to the Media Type
One of the biggest mistakes we see is treating all drives the same. A method that works perfectly for a traditional Hard Disk Drive (HDD) can be completely useless—or even damaging—on a modern Solid-State Drive (SSD).
Old-school spinning hard drives are magnetic. That means they respond well to software overwriting (Clear) and degaussing (Purge). A degausser blasts the drive with a powerful magnetic field, instantly scrambling the platter’s alignment and wiping all the data clean.
SSDs are a different beast entirely. They use flash memory, not magnetic platters, which makes degaussing completely ineffective.
Because SSDs use wear-leveling algorithms to spread writes across all memory cells, standard overwriting software often misses hidden pockets of old data. This makes those traditional wiping tools unreliable for SSDs.
For SSDs, the most reliable sanitization methods are built right into the drive's own firmware:
- ATA Secure Erase: A command that tells the SSD controller to reset every single storage block to a factory-clean state.
- Cryptographic Erase (CE): This is by far the fastest and most efficient method for self-encrypting drives (SEDs). It simply deletes the media encryption key, which instantly turns all the encrypted data on the drive into unintelligible junk.
If these firmware-based methods aren't an option or fail to execute, the only certified path forward for an SSD holding sensitive data is physical destruction.
Factoring in Cost and Asset Reuse
Of course, your decision has a financial component. While physical destruction provides the absolute highest level of security, it also drops the asset's value to zero. You can't exactly resell a bucket of shredded aluminum.
On the other hand, software wiping, when done correctly, keeps the hard drive in working order. This means it can be redeployed within your organization, donated, or sold to recover some of its initial cost. It’s a smart choice for routine hardware refreshes where the data isn't top-secret.
Ultimately, you have to find the right balance between security requirements and operational costs. For a massive data center decommissioning or a refresh involving thousands of assets, trying to manage this process in-house can become a huge logistical headache.
This is often the point where partnering with a certified ITAD vendor makes sense. Exploring corporate e-waste solutions can provide fully auditable, compliant data destruction, all while freeing up your IT team to focus on what they do best. A good partner helps you make the right call for every single asset, ensuring both security and value recovery are always top of mind.
Your Guide to Software-Based Wiping
When physical destruction is overkill and you need to keep assets in rotation, software-based wiping is your go-to method. This approach, which aligns with the NIST 'Clear' standard, overwrites every single addressable sector on a drive with new data, effectively destroying what was there before. It's a methodical, auditable process that’s perfect for routine hardware refreshes or prepping devices for internal redeployment.
But let's be clear: this isn't a simple "click and forget" task. A successful software wipe requires careful planning, the right tools, and rigorous verification to ensure it actually meets compliance standards. Without a structured workflow, you risk leaving sensitive data behind or creating a process that just doesn't stand up to an audit.

Asset Inventory and Tool Selection
Before you wipe a single byte of data, you need a crystal-clear inventory. Get the serial number, asset tag, drive type (HDD, SSD, NVMe), and capacity for every device slated for sanitization. This record is the absolute foundation of your audit trail.
Next, you'll need to choose your weapon. Several powerful software tools are out there, each with its own strengths.
- DBAN (Darik's Boot and Nuke): The long-standing, open-source favorite for bulk wiping HDDs. It's simple, reliable, and gets the job done for basic overwriting tasks.
- KillDisk: A commercial tool that offers more advanced features, including support for numerous wiping standards, customizable reports, and the ability to run within a live OS.
- Blancco Drive Eraser: An enterprise-grade solution that provides certified, tamper-proof reports essential for strict compliance environments like HIPAA or GDPR.
For a single server drive, DBAN might be all you need. But for a fleet of 500 laptops containing regulated data, a certified tool like Blancco is a much safer bet.
Choosing the Right Wiping Standard
Not all overwrites are created equal. The standard you choose dictates how many times the drive is overwritten and with what kind of data pattern. Picking an unnecessarily complex standard can waste hours, while using one that's too simple may not meet your security policy.
A common and widely accepted option is the DoD 5220.22-M standard, which involves three passes. While effective for older HDDs, modern standards like NIST SP 800-88 Clear (a single-pass overwrite) are now considered more than sufficient for most non-classified data—and are much faster.
Don't fall into the trap of believing more passes are always better. For modern drives, a single, verified pass that overwrites every sector is all that's needed to render data unrecoverable. The extra time spent on a 7-pass wipe provides no real additional security benefit.
Executing the Wipe: A Practical Workflow
Once you've selected your tool and standard, the real work begins. The most common method involves creating bootable media (like a USB drive) with your chosen wiping software. This allows you to boot the target machine directly into the wiping environment, completely bypassing the installed operating system.
Let’s walk through a common scenario using a Linux-based tool to wipe a secondary SATA drive identified as /dev/sdX.
- Boot from Media: Start the target machine from your bootable USB drive.
- Identify the Target Drive: This is the most critical step. Use a command like
lsblk -fto list all connected storage devices. You must double-check the device name, size, and any existing partitions to ensure you're targeting the correct drive. Wiping the wrong one is irreversible. - Initiate the Wipe: The command itself will vary by tool. For a simple zero-fill overwrite on an HDD, you might use a command like this:
sudo dd if=/dev/zero of=/dev/sdX bs=1M status=progress
This command reads from a source of zeros (/dev/zero) and writes it directly to the target drive (/dev/sdX), showing the progress as it runs.
This hands-on process works well for smaller batches, but it really highlights the potential for human error. The consequences of a mistake can be severe. The global hard drive destruction service market surged to USD 1.5 billion in 2023 and is projected to hit USD 3.6 billion by 2032, a trend driven by the high stakes of data security. Incidents like Morgan Stanley's $35 million fine for improper data wiping serve as a powerful reminder that even the largest organizations can stumble without airtight processes. You can dive deeper into the market trends and see the risks of failed data sanitization in this comprehensive report.
The Final, Non-Negotiable Step: Verification
The wipe isn't finished until you've proven it. Verification is the process of reading back a sample of sectors from the drive to confirm they were successfully overwritten according to the chosen standard. Any reputable wiping tool will have a built-in verification feature—if it doesn't, find a new tool.
The software will generate a log or report that serves as your proof of sanitization. This document is a key part of your audit trail and should contain:
- The serial number of the wiped drive.
- The software tool and version used.
- The specific wiping standard applied (e.g., NIST 800-88 Clear).
- The start and end time of the process.
- A clear statement of success or failure.
A snippet from a verification log might look something like this:
[INFO] Wipe started for /dev/sda (Serial: Z1P2ABCD)
[INFO] Using method: NIST 800-88 Clear (1 pass, verify)
[INFO] Pass 1/1: Writing with 0x00 pattern…
[SUCCESS] Pass 1/1 completed.
[INFO] Verification started. Reading random sectors.
[VERIFY] Sector 1024: OK
[VERIFY] Sector 512000: OK
…
[VERIFY] Sector 976773167: OK
[SUCCESS] Verification complete. All sectors match pattern.
[REPORT] Wipe successful for /dev/sda (Serial: Z1P2ABCD) at 2024-10-26 14:30:15 UTC.
Without this verifiable proof, you're operating on faith—and faith is not a defensible security control. Save every single report and tie it back to your initial asset inventory. This closed-loop documentation is what separates a professional process from a risky shortcut.
Mastering Physical Destruction and Degaussing
Sometimes, a software wipe just doesn't cut it. When you're dealing with drives holding your most sensitive data, drives that have failed, or assets that simply need to be retired with zero doubt, you have to turn to physical destruction. This is the final, irreversible step.
For these situations, two methods are the gold standard: degaussing and shredding. Choosing the right one comes down to what kind of drive you're handling. They work on completely different principles, and getting it wrong means your data isn't as gone as you think.
The Power of Degaussing for Magnetic Media
Degaussing is a NIST Purge level technique built for one thing: magnetic storage like traditional Hard Disk Drives (HDDs) and old backup tapes. A degausser blasts the drive with a powerful magnetic field, one that’s exponentially stronger than the field used to write the data in the first place.
This massive magnetic pulse instantly neutralizes the drive's platters, scrambling every last bit of data. But it does more than that. It also wipes out the low-level formatting and servo tracks the drive needs to even function.
Critical Insight: After a degaussing cycle, an HDD is basically a brick. The process renders the drive completely inoperable—it can never be used again. This makes it a perfect solution for failed drives or any end-of-life magnetic media you have no intention of reusing.
But here’s the catch: its greatest strength is also its biggest weakness. Degaussing is 100% ineffective on Solid-State Drives (SSDs), NVMe drives, or any other flash-based storage. You can put an SSD through a degausser all day, and it won't do a single thing to the data on the memory chips.
When Shredding Is the Only Answer
For the absolute highest level of security—especially for SSDs or a mixed bag of drives—nothing beats physical shredding. This is the NIST Destroy method in its most literal form. Industrial shredders with powerful steel teeth grind drives, servers, and other hardware into tiny, unrecognizable fragments.
The security of shredding is all about the final particle size. A shred size of 25mm is typically fine for most commercial data. But for top-secret, classified, or highly regulated information, high-security shredders can reduce a drive to pieces as small as 2mm. At that point, data recovery is physically impossible.
For any data center operator, shredding at scale means bringing in a certified partner. On-site shredding, where a mobile shred truck comes directly to your facility, offers unmatched peace of mind. You can actually watch your assets turn into scrap metal, which is a powerful link in the chain of custody.
- Witness the process: Don’t underestimate the value of seeing your drives get destroyed with your own eyes.
- Verify shred size: Make sure the vendor's equipment can hit the particle size your security policy demands.
- Demand a Certificate of Destruction: This document is your official, auditable proof that the job was done right.
Managing the logistics of decommissioning IT infrastructure is a massive project. For a deeper look, learn more about professional data center equipment disposal services in Dallas-Fort Worth to see how a certified partner handles security from pickup to final destruction. For organizations governed by HIPAA, GDPR, or other regulations, that auditable proof isn't just a best practice—it's a requirement.
Creating a Defensible Audit Trail

Successfully wiping a hard drive is only half the battle. If you can’t prove it, you’re leaving your organization dangerously exposed to compliance failures and steep penalties. A defensible audit trail is the final, non-negotiable step that shows you handled every asset according to policy. It’s what stands between you and a potential seven-figure fine.
This documentation isn't just about internal record-keeping; it’s your critical liability shield. It demonstrates due diligence to auditors, stakeholders, and regulators with a clear, unbroken chain of custody from the moment an asset is decommissioned to its final disposition.
The Anatomy of an Airtight Chain of Custody
Your audit trail has to start with a robust chain-of-custody document. Think of this as the asset's official biography—a living record that tracks its entire journey, ensuring it's accounted for at every single stage. No gaps, no questions.
A comprehensive chain-of-custody form should always include:
- Asset Identifiers: Unambiguous details like serial numbers, asset tags, and device models.
- Custodial Sign-offs: Dated signatures from every person who handles the asset, from the IT tech who pulls it from the rack to the driver who picks it up.
- Location Tracking: A clear log of all physical movements, noting dates, times, and specific locations.
- Sanitization Method: The exact data destruction method used (e.g., NIST 800-88 Purge, 3-pass overwrite).
- Final Disposition: The asset’s ultimate fate—redeployed, recycled, or physically destroyed.
This level of detail eliminates any ambiguity. It provides a clear, defensible record that answers the critical questions any auditor will ask: who had it, where was it, and what happened to its data?
Generating and Archiving Sanitization Records
For every single wipe or destruction event, you need to generate and securely archive a corresponding certificate. This is your tangible proof that the data is gone for good.
If you’re doing software wipes, that means saving the verification logs from your wiping utility. These reports are what confirm that every sector was successfully overwritten and verified. If you’re using a certified ITAD partner for physical destruction, you need a Certificate of Data Destruction (CoD) from them.
A proper CoD is more than just a receipt. It's a legally binding document that transfers liability from your organization to the vendor. To be valid for a compliance audit, it must list every single serial number of the destroyed assets.
Understanding what makes this documentation valid is crucial. You can get a much clearer picture by reading our guide on what a proper Certificate of Destruction for hard drives must contain.
The importance of these records cannot be overstated, especially as the stakes for data security continue to rise. The data destruction market is projected to hit USD 39.3 billion by 2035, a surge driven by strict regulations and the escalating cost of breaches. With global breach costs now averaging $4.88 million, the investment in a meticulous audit trail is tiny compared to the potential fallout. You can find more on this trend in this detailed industry report.
From a regulator’s perspective, without this proof, the wipe never happened.
When to Partner with a Certified ITAD Provider
Handling hard drive wiping in-house might seem like a practical way to save money, especially when you're only dealing with a few machines. But that logic quickly falls apart as your organization scales.
Sooner or later, you hit a tipping point. It could be a large data center decommission, a company-wide hardware refresh, or just the slow realization that your internal team doesn't have the bandwidth—or the specialized tools—for guaranteed, compliant data destruction.
At this stage, the DIY approach goes from being a manageable task to a serious liability. Juggling dozens or even hundreds of drives, verifying the correct sanitization method for each one, and creating an airtight audit trail can easily overwhelm an IT department that should be focused on strategic projects, not end-of-life logistics.
Identifying the Tipping Point
There are a few clear signals that it’s time to call in a professional. If your team is retiring equipment governed by strict regulations like HIPAA, or if the sheer volume of assets is climbing, the risk of a simple human error or a compliance misstep grows exponentially.
A professional IT Asset Disposition (ITAD) partner isn't just another vendor; they're a critical part of your risk management strategy.
An experienced ITAD provider transforms the complex, high-stakes job of asset retirement into a secure, auditable, and streamlined process. They take on the liability for data destruction, giving you certified proof that protects your organization from steep regulatory fines and brand damage.
Handing this off to a specialist brings several advantages that go far beyond convenience.
- Certified and Auditable Processes: A professional partner uses enterprise-grade tools and follows standards like NIST SP 800-88. They provide tamper-proof Certificates of Destruction for every single asset, creating an unimpeachable paper trail.
- Secure Logistics and Chain of Custody: They handle everything from secure, GPS-tracked transport to maintaining a meticulous chain of custody from the moment the equipment leaves your facility.
- Responsible E-Waste Recycling: Certified providers also ensure that any non-reusable materials are recycled in an environmentally sound way, helping you meet corporate sustainability goals.
Ultimately, working with a certified ITAD provider is an investment in your company's security and operational efficiency. For organizations in North Texas ready to build a robust program, exploring professional IT asset disposition services in Dallas-Fort Worth is the best way to ensure secure and compliant hardware retirement. This frees up your team to focus on their core mission, giving you peace of mind that your data is being handled correctly.
Common Questions We Hear on the Ground
Even with the best data destruction plan, some questions always pop up. Here are a few of the most common ones we hear from IT leaders trying to get this right, along with some straightforward answers.
What’s the Real Difference Between Formatting and Wiping a Drive?
Think of formatting a hard drive like ripping the table of contents out of a book. The pages (your data) are all still there, they’re just a little harder to find. Basic data recovery software can easily piece it all back together.
Wiping, on the other hand, is like running every single page through a shredder. It overwrites the entire drive with random data, making the original information permanently unreadable. When it comes to enterprise security or compliance, wiping is the only method that counts.
A formatted drive is not a clean drive. Data recovery from a formatted disk is a routine task, making it an unacceptable risk for any sensitive corporate or personal information.
Can I Just Wipe an SSD the Same Way as an Old Hard Drive?
No, and this is a mistake that can have serious consequences. The technology inside a Solid-State Drive (SSD) is completely different from a spinning Hard Disk Drive (HDD).
SSDs use a process called wear-leveling to spread data across their memory chips, which prolongs the drive's life. The problem is that traditional overwriting software can’t control this process, often missing entire pockets of the original data.
For SSDs, you need to use the tools built right into the drive's firmware:
- ATA Secure Erase: This is a firmware command that tells the drive to reset every single storage block back to its original factory state.
- Cryptographic Erase (CE): On Self-Encrypting Drives (SEDs), this is the gold standard. It simply deletes the internal encryption key, instantly rendering all the data on the drive useless. It’s incredibly fast and secure.
If for some reason those firmware commands don't work or aren't available, your only truly secure option for an SSD with sensitive data is physical destruction.
How Do I Prove a Drive Was Wiped for an Audit?
In the world of compliance, if it isn’t documented, it didn’t happen. Just saying you wiped a drive won’t hold up in an audit; you need a paper trail for every single asset.
If you’re wiping drives in-house with software, that means saving a detailed report from the utility for every single drive. The log needs to confirm that every sector was successfully overwritten and verified, linked to the drive’s serial number.
When you use an ITAD partner for physical destruction, insist on a Certificate of Destruction. This is a legally binding document that creates an auditable record. It should detail the serial numbers of the destroyed assets, the method used, and the date, proving your chain of custody was never broken.
When managing this process in-house becomes too risky or resource-intensive, a certified partner is your best defense. Dallas Fortworth Computer Recycling offers nationwide, fully auditable ITAD services, ensuring your data is properly destroyed and documented every single time. Learn more about our secure data destruction services.